
Most people, when they think of pastel, picture delicate, slightly washed-out drawings, the kind of pale atmospheric work you see in 18th-century portrait miniatures. Then you look at Edgar Degas's late pastel work, the ballet series from the 1880s and 1890s, and the association falls apart completely. Degas's pastels are dense, layered, vibrating with artificial light. The surface of "The Star" (1878) at the Musée d'Orsay has a physical depth that photographs do not convey: multiple layers of color built up using fixative between applications, the same technique Degas developed by treating the medium like oil paint but with immediate mark-making that oil's slow drying time prevents. These are not delicate drawings. They are some of the most technically sophisticated works in the Orsay's collection.
The confusion about pastels usually starts with the fact that "pastel" names four quite different materials that happen to share a basic structure: pigment bound with a minimal amount of chalk or gum. Soft pastels, oil pastels, hard pastels, and pastel pencils all behave differently, suit different kinds of work, and require different techniques. Treating them as interchangeable is the first mistake most beginners make, and it explains most of the early frustration with the medium.
In this guide, you will learn how each pastel type works, where the medium sits in art history, the core techniques for both soft and oil pastels, and practical advice for setting up a working pastel practice.
The Four Types of Pastel
All pastels share the same basic structure: finely ground pigment held together with a small amount of binder. The type and quantity of binder determines the character of each form.
Soft Pastels
Soft pastels have the least binder of any pastel type, which makes them chalky, crumbly, and intensely pigmented. They go onto the surface with almost no pressure, layer easily, and blend with a finger, a tortillon, or a soft cloth. The drawback is fragility: the pigment sits loosely on the surface and requires fixative to prevent smearing. Even fixed work needs careful storage. Professional-grade soft pastels from Schmincke, Unison, and Sennelier contain the highest pigment loads. Rembrandt is an excellent student grade for learning.
Oil Pastels
Oil pastels bind pigment with oil and wax rather than chalk, giving them an entirely different character. They are more robust, more adhesive to the surface, and harder to blend with a finger alone. They respond to solvents, mineral spirits or artist-grade turpentine applied on a brush, which dissolves the wax binder and allows smooth blending or wash effects similar to a painted surface. Oil pastels do not require fixative because the oil and wax make them inherently stable. They have a waxy, impasto quality that suits bolder, more graphic work. Sennelier produces the most respected professional oil pastels; cheaper student brands have lower pigment loads and waxier, less responsive surfaces.
Hard Pastels
Hard pastels contain more binder than soft pastels, making them denser, less crumbly, and capable of drawing finer lines. They are less intensely pigmented but offer more control, which makes them useful for establishing an initial composition and for adding crisp edges or fine detail over a soft pastel base. Many pastel artists sketch the main forms in hard pastel or Conte crayon before switching to soft pastel for the full color work.
Pastel Pencils
Pastel pencils are hard pastel in pencil form, sharpened to a point for precise work. They are well suited to botanical illustration, portraiture, and any work requiring fine line alongside broader color areas. Combined with soft pastels for larger passages, they provide a level of control that soft pastel sticks alone cannot match.
Pastels in Art History: From Carriera to Degas
Pastel has been a serious fine art medium since the 16th century, but its cultural peak came in 18th-century France and then again in the Impressionist era.
The Venetian artist Rosalba Carriera (1673-1757) was among the first to establish pastel as a medium for formal portraiture rather than preparatory sketching. Her portraits of Venetian aristocracy demonstrated that pastel could achieve subtlety and richness previously associated only with oil painting. Carriera worked in Paris during the 1720s, influencing a generation of French pastellists and making the medium fashionable among the aristocracy. Maurice Quentin de La Tour took her lead and produced pastel portraits of extraordinary technical refinement in the mid-18th century. His "Self-Portrait" at the Louvre, measuring over 60 centimeters, demonstrates the medium at a scale and degree of finish that competes directly with oil painting.
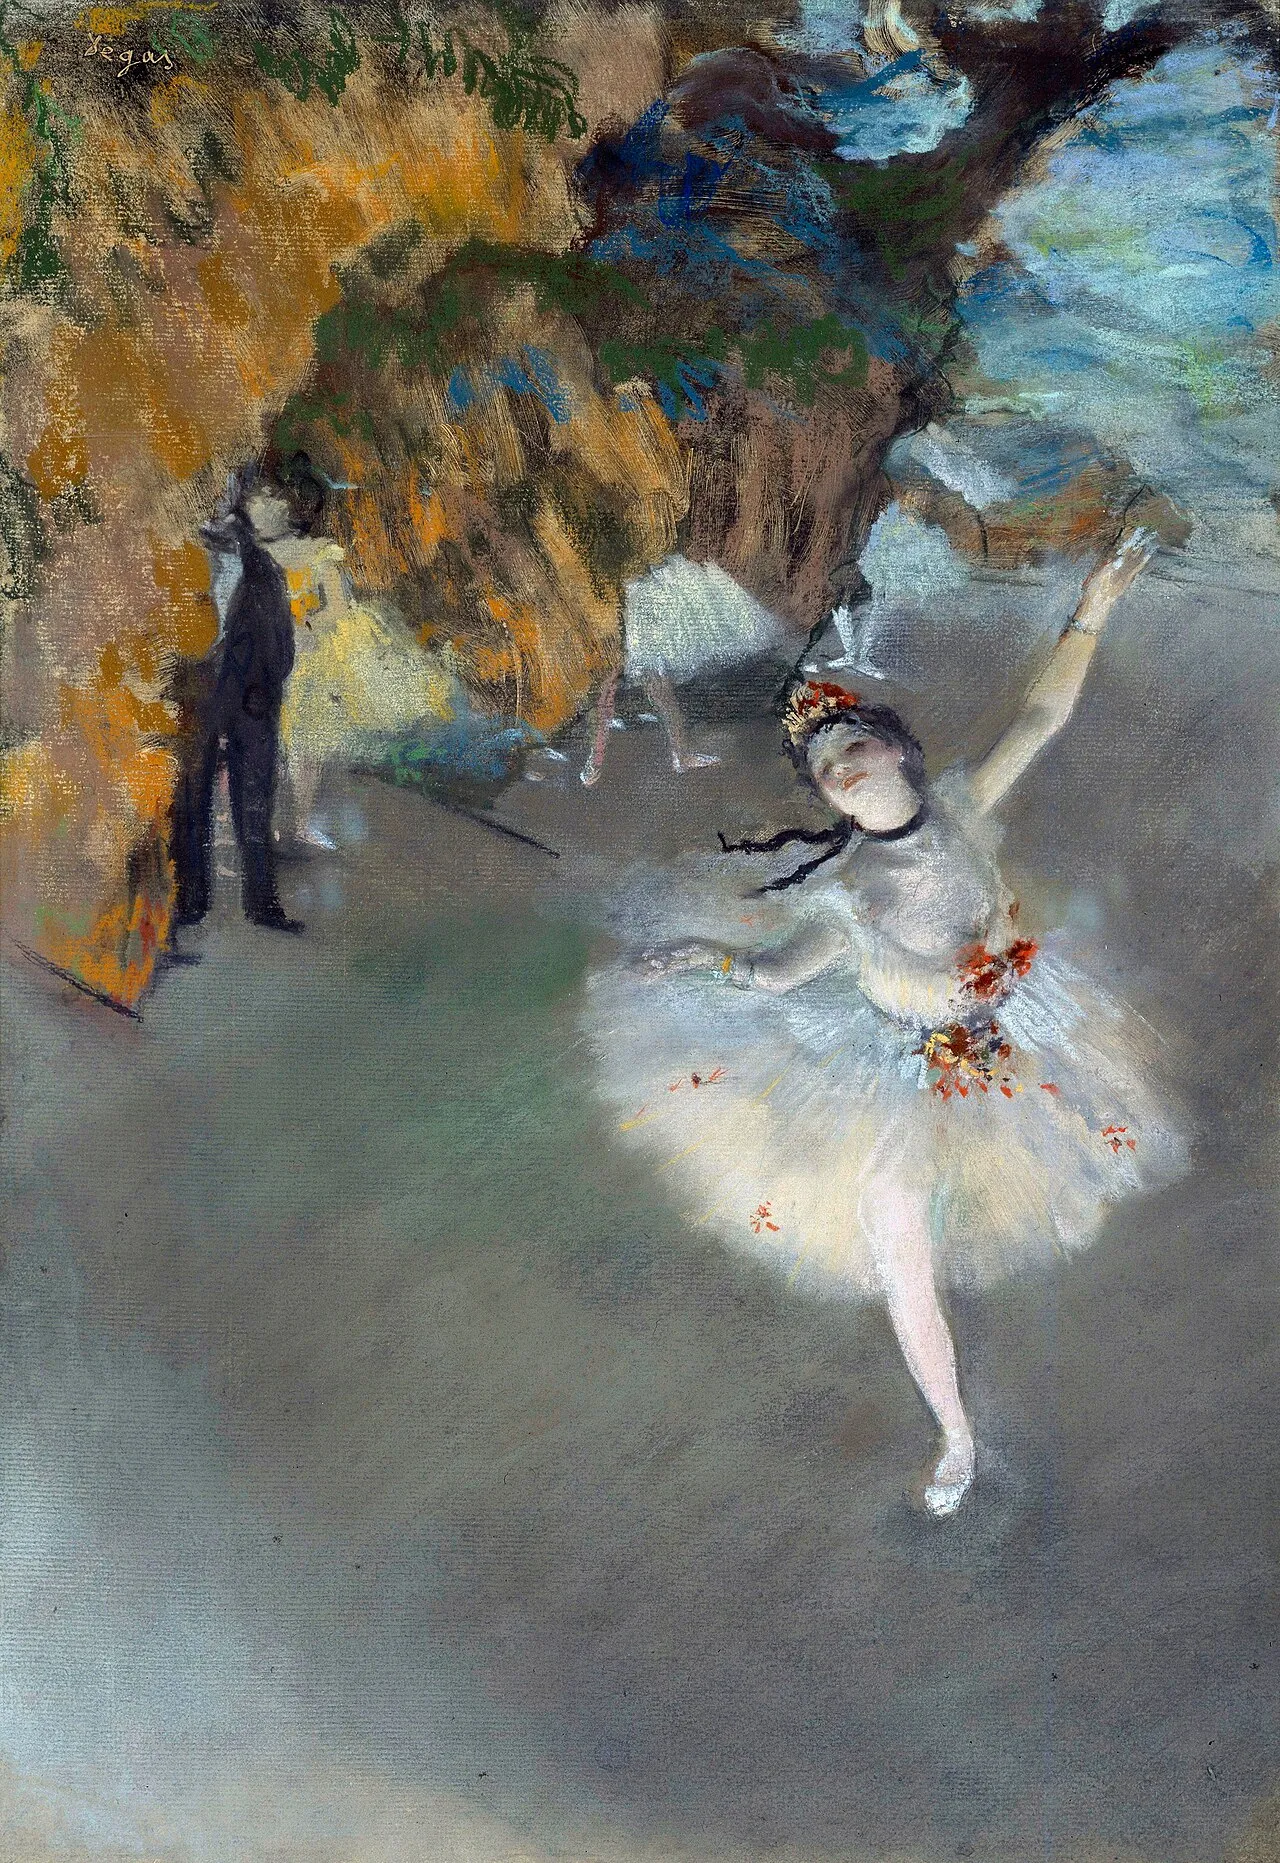
Edgar Degas, "The Star" (1878), pastel on paper, 60 x 44 cm. Musée d'Orsay, Paris. The dense, layered surface of this work is the result of Degas applying fixative between color layers to build up unusual depth. The Musée d'Orsay's collection entry documents the technical analysis of this piece. Image: Public domain, via Wikimedia Commons
Edgar Degas (1834-1917) transformed what pastel was capable of. After a serious eye condition made detailed oil painting increasingly difficult, he turned almost entirely to pastel and created some of his greatest work in the medium. His technique was sophisticated and unusual: he layered colors, applied workable fixative between layers to increase the surface tooth for further application, worked over dried pastel with diluted pastel dissolved in a spirit solvent he called peinture a l'essence, and sometimes steam-softened the surface to blend areas. The result is pastel work of a density and richness that looks nothing like the delicate atmospheric quality most people associate with the medium.
Mary Cassatt (1844-1926), closely associated with the Impressionist circle, also produced powerful pastel work, particularly in her intimate scenes of mothers and children. Her approach tended toward lighter, airier effects than Degas, using the medium's natural chalky luminosity rather than building dense layers. Both approaches are still valid models for contemporary practice.
Working With Soft Pastels
Soft pastel technique is built around one fundamental property: the pigment does not dissolve or bind. It sits on the surface of the paper, held in place by the paper's tooth, its surface texture. After three or four layers, the paper is too saturated with pigment to hold more, and additional applications simply push existing color around. Learning to work within this constraint is the central skill of soft pastel practice.
The Right Paper Matters
Standard printer paper or watercolor paper does not have sufficient tooth to hold pastel adequately. Sanded papers like Uart or Pastelmat offer the most tooth and can hold the most layers. Velour paper has a textile surface that grips pastel very firmly. Traditional pastel papers like Canson Mi-Teintes fall between these options. Colored paper is almost always preferable to white because the paper tone shows through between marks and contributes to the color relationships of the whole piece.
Building Color: Dark to Light
Work from dark values to light ones. Lay in the darkest areas first, then mid-tones, then highlights. Soft pastel has no transparency, so you cannot glaze dark tones over light ones the way you can in oil or watercolor. Save your most saturated, brightest color for final applications where you want maximum impact. Sharp edges come from applying pastel with the end of the stick rather than its side.
Fixative Between Layers
Applying workable fixative between layers effectively gives the surface fresh tooth, allowing further pastel to adhere over what is already there. Fixative does darken colors slightly and can reduce the luminosity of the top layer if overused. Degas used fixative between layers precisely to build the unusual density of his pastel surfaces. Used carefully, it significantly extends the number of layers you can apply.
Working With Oil Pastels
Oil pastels require a different approach because the oil and wax binder makes them tenacious on the surface rather than loosely adherent.
Solvent Blending
Apply mineral spirits with a brush or cloth to oil pastel marks on the surface. The solvent dissolves the wax binder partially, creating smooth transitions and flat areas of color similar to a painted wash. This lets you establish large tonal areas quickly and then work back into them with fresh pastel once the solvent has evaporated.
Sgraffito and Scraping
Build up two or more layers of oil pastel, then scrape back through the upper layer with a palette knife, skewer, or fingernail to reveal the color below. This sgraffito technique creates textural interest and can reveal color combinations you did not predict. It works well for landscape work where you want to suggest the complexity of rough surfaces like stone, bark, or textured ground. For related techniques in other media, the guide to texture in art covers the broader principles of building physical surface in painting.
Setting Up a Pastel Practice
Beyond paper and pastels, you need very little. A drawing board, clips to hold the paper, good directional light, and a shallow tray to catch falling pastel dust are sufficient to start. Organize pastels by color family rather than keeping them in manufacturer packaging: working from trays organized by hue, all blues together, all reds, lets you find colors quickly and see relationships as you work. Many pastel artists keep sticks in trays of ground rice, which absorbs the dust from neighboring sticks and prevents colors from contaminating each other.
One practical health note: soft pastel dust contains fine pigment particles, some of which include cadmium compounds and other materials with specific health risks. Working in a ventilated space, washing hands after sessions, and avoiding touching your face while working are sensible precautions. Extended work sessions with dry, dusty pastels warrant a dust mask.
Final Thoughts
Pastel's combination of drawing directness and painting richness makes it genuinely distinctive among art media. It rewards fast decision-making and direct observation in a way that more forgiving media sometimes discourage. Because corrections are limited, particularly with soft pastels, you are forced to look carefully before you mark. That discipline tends to improve your drawing more quickly than working in a medium where everything can be undone.
Degas used pastel not because it was easy but because it let him work at speed, layer color with unusual density, and capture the specific electric quality of artificial stage light in ways that oil painting's longer drying times prevented. The medium can do the same for your work. Ready to explore how color works across different media? The guide to color theory provides the foundation for making stronger decisions about color in pastel and every other medium. For how printmakers approach paper and surface with similar concerns, see printmaking fundamentals.


