
Around 1420, Filippo Brunelleschi walked out to the piazza in front of the Florence Baptistery with two objects: a painted panel showing the Baptistery and a small mirror. He instructed observers to hold the painted panel up to one eye, look through a hole drilled in its center at the real Baptistery in the mirror's reflection, then lower the mirror to compare the painting directly to the building. The two images matched with uncanny precision. Brunelleschi had discovered, or rather formalized, linear perspective: the geometric system by which three-dimensional space is projected onto a flat surface. Within fifty years, every significant painter in Italy was using it. Leonardo, Raphael, and Michelangelo all built their compositions around it. The discovery changed how Western artists thought about pictures more fundamentally than almost anything else in art history.
Perspective is not just a mechanical trick for making things look realistic. It is a philosophical position: the view from a single, fixed eye at a specific point in space. Every perspective drawing embeds the viewer's position in its construction. The vanishing point toward which parallel lines converge is not in the picture itself. It is where the viewer stands. This is why perspective creates such a convincing illusion of depth. It is not merely a representation of space. It is a representation of experience.
This guide explains one-point and two-point perspective with the construction rules you need to use them accurately, and shows why understanding perspective remains essential for any artist trying to depict three-dimensional space convincingly.
The Three Concepts That Underlie All Perspective
Every perspective system is built on the same three ideas. Understanding them clearly before you pick up a pencil prevents most of the confusion that trips up beginners.
Eye level is the height of your eyes above the ground. When you sit, your eye level is low. When you stand on a ladder, it is high. In a perspective drawing, the horizon line represents the viewer's eye level. Objects below eye level appear below the horizon line; objects above eye level appear above it. This single principle explains why building rooftops appear below the horizon when you look from a tall building's roof, and above the horizon when you stand at street level looking up.
The horizon line runs horizontally across the picture plane at the viewer's eye level. In outdoor scenes, it corresponds to where sky meets earth. In interiors or urban views where the actual horizon is not visible, the horizon line is still present conceptually. All perspective measurements are taken from it.
Vanishing points are the points on the horizon line toward which parallel lines in three-dimensional space appear to converge. All horizontal lines that run in the same direction converge at the same vanishing point. Lines running away from the viewer to the left converge at a point on the left. Lines running away to the right converge at a point on the right. The number of vanishing points determines whether a drawing uses one-point, two-point, or three-point perspective.
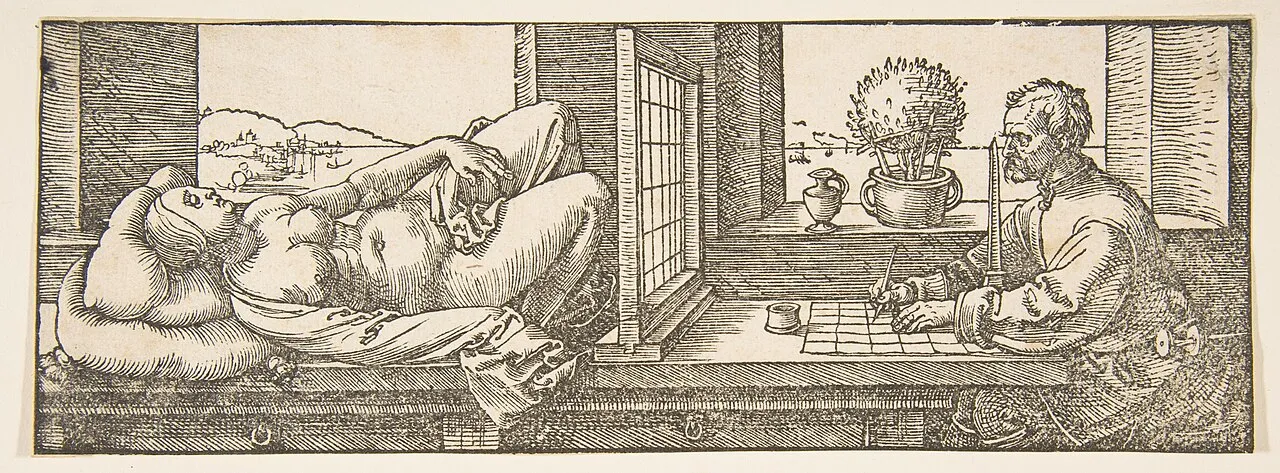
Albrecht Dürer, "Draughtsman Drawing a Recumbent Woman" (1525), woodcut. Dürer published detailed instructions for perspective devices in his 1525 treatise "Underweysung der Messung." The grid between artist and model creates a fixed viewpoint, demonstrating Brunelleschi's principle that perspective drawing mathematically encodes the viewer's position. Image: Public domain, via Wikimedia Commons
One-Point Perspective
One-point perspective uses a single vanishing point on the horizon line. It describes the view when you are looking directly at one face of an object: a wall, a building front, the end wall of a corridor. The receding edges run away from you toward that single point. Think of a railway track disappearing into the distance, or a city street photographed from dead center looking straight down its length.
How to Construct a One-Point Perspective Drawing
Draw a horizontal line across the middle of your paper. This is your horizon line (eye level).
Place a single vanishing point (VP) on the horizon line. Its position left or right of center determines where in the scene the viewer appears to be standing.
Draw the front face of your object as a flat rectangle. This face is parallel to the picture plane and is not distorted by perspective.
From each corner of the front face, draw lines going directly to the vanishing point. These define the edges that recede into depth.
Draw a vertical line between the upper and lower receding lines to define the back edge of the object. All back edges remain parallel to the front face.
One-point perspective produces the most symmetrical, frontal compositions. Raphael's "The School of Athens" (1509-1511), painted in the Apostolic Palace in the Vatican, uses one-point perspective with the vanishing point positioned exactly at the central archway behind the figures of Plato and Aristotle. That single point pulls every architectural line toward the center of the composition, organizing over a hundred figures into a coherent, deep space. The perspective is doing enormous structural work that most viewers absorb without noticing. The Vatican Museums' documentation of the Stanze di Raffaello describes how the architectural setting was designed specifically to interact with the fresco's illusionistic depth.
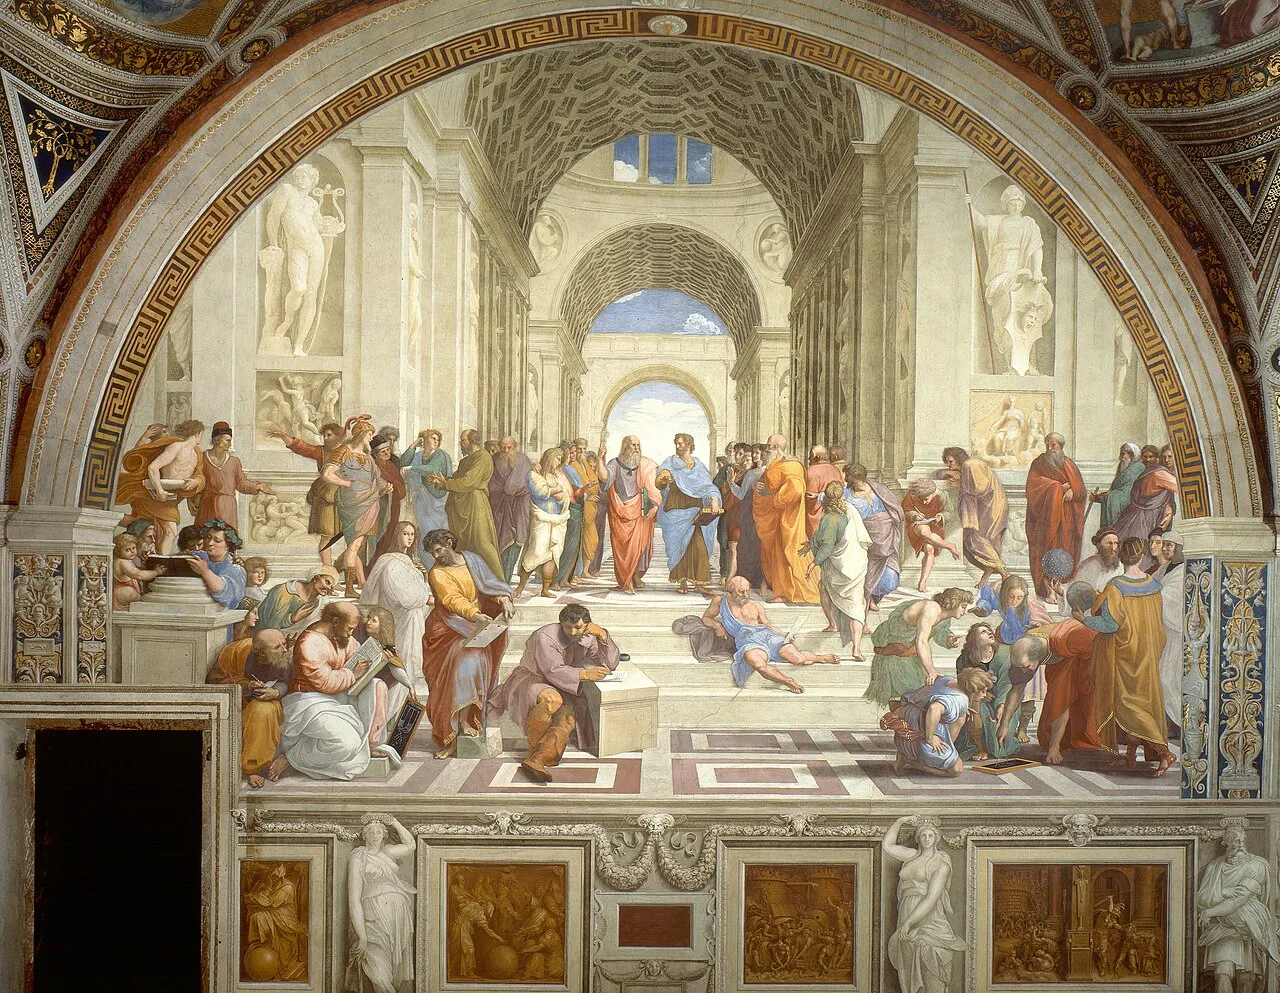
Raphael, "The School of Athens" (1509-1511), fresco, 500 x 770 cm. Apostolic Palace, Vatican. The single vanishing point at the central archway pulls the entire composition into convincing depth. This is the most celebrated use of one-point perspective in Renaissance painting. Image: Public domain, via Wikimedia Commons
Two-Point Perspective
Two-point perspective uses two vanishing points at different positions on the horizon line. It applies when you are viewing an object from a corner, seeing two of its faces simultaneously. This is how most architectural drawing works: you are looking at the corner of a building so that both the front face and the side face recede in different directions.
How to Construct a Two-Point Perspective Drawing
Draw a horizon line. Place two vanishing points (VP1 and VP2) at the far left and far right of the line. The wider apart the vanishing points, the less distorted the drawing will look.
Draw a vertical line near the center of the paper. This is the vertical corner edge of your object, the edge closest to the viewer.
From the top of the vertical line, draw lines going to both VP1 and VP2. These are the top edges receding in both directions.
From the bottom of the vertical line, draw lines going to both VP1 and VP2. These are the bottom edges.
Draw vertical lines between the receding top and bottom lines to define the far vertical edges of each face.
Two-point perspective produces more dynamic compositions than one-point, because the diagonal recession of two faces creates visual movement and tension. Most observational architectural drawing and urban sketching uses two-point perspective intuitively, even when the artist has not formally constructed it. Once you know the system, you can read it in almost any street photograph or architectural render.
Three-Point Perspective: When Verticals Converge
Three-point perspective adds a third vanishing point above or below the horizon line to account for vertical convergence. When you look up at a tall building, the vertical lines do not stay parallel. They converge toward a point in the sky. When you look down from a great height, they converge toward a point below. In two-point perspective, verticals stay perfectly parallel. That is fine for most situations. Three-point becomes necessary when the vertical convergence is visually obvious, as in a skyscraper viewed from street level where the building clearly narrows toward the top.
For most observational drawing and illustration, two-point is sufficient. Architects and concept artists working on dramatic viewpoints rely on three-point regularly, as do comic book artists drawing superhero scenes with extreme upward or downward views.
The Most Common Perspective Mistakes
Placing vanishing points too close together is the single most common error. When the vanishing points are too close, the recession looks extreme and distorted, like a photograph taken with a wide-angle lens held two inches from the subject. Push them to the edges of your paper, or even off the edges onto tape or a separate strip of paper attached to your drawing surface. The recession will look more natural immediately.
The second common mistake is ignoring the relationship between object height and the horizon line. Objects below eye level should sit below the horizon. Objects above eye level should rise above it. A box sitting on a table should show its top face if the horizon is above it, and its bottom face if the horizon is below it. Getting this relationship right is what makes a perspective drawing feel spatially coherent rather than floating and arbitrary.
The third mistake is treating perspective as a formula applied after the drawing is made. Perspective should be the structural skeleton that underlies a composition from the beginning. Start with the horizon and vanishing points, not with the object.
Why Perspective Still Matters If You Are Not Drawing Buildings
Even artists who never draw architecture need perspective. Figure drawing requires understanding how the human form recedes in space: a foreshortened arm, a face tilted toward the viewer, feet closer to the viewer than the head. Still life composition depends on getting the ellipses of cups and bowls right, which requires understanding that those ellipses are circles seen in perspective. Landscape painting requires convincing recession into the distance. Perspective is not a special technique for architectural illustration. It is the underlying spatial logic of any picture that contains objects in three-dimensional space.
Cézanne deliberately distorted perspective in his late paintings, showing multiple viewpoints simultaneously rather than committing to a single fixed eye position. Cubism took this further. But Cézanne understood perspective deeply before he broke it. The distortions are not accidents or errors. They are choices made in full knowledge of what conventional perspective would have given him and why he preferred something else.
Final Thoughts
Perspective is a tool for depicting spatial experience, not a cage for confining creative vision. Understanding how linear perspective constructs convincing space gives you the ability to use it, modify it, or abandon it with full awareness of what you are doing. You cannot productively break a rule you have not first learned.
Start by drawing simple boxes in one-point and two-point perspective until the construction feels automatic. Then apply those skills to observational drawing: a room interior, a street view, a building corner. An afternoon of construction exercises will teach you more than most verbal explanations. Build your spatial understanding further with our guide to drawing fundamentals, and for how perspective transformed Renaissance painting as a cultural event, see our guide to Renaissance art. The principles of perspective also connect directly to how depth and movement function in composition, covered in our guide to composition and visual balance.


